2.2 First steps: getting acquainted with R
Let’s get started! Open up RStudio. Task one will be to create a project. A project is a central place to organize your materials for this course. You may do this already, but R can be picky about its working directory - and navigating to it. I found creating a project file is an easy way to avoid some of that fussiness. Let me describe steps in how to do this.
- In
RStudioselect “File” then “New Project” - Next select the first option “New Directory” in the window - this will create a new folder on your computer.
- At the next window choose New Directory or Existing Directory - it depends on where you want to place this project.
- Name the project as you like.
- Click the “Create Project” button.
2.2.1 “Working” with R
Our next step: where do we get R to do something? For example if we wanted to compute of 4+9 (yeah, it is 13, but this is an illustrative example), we could type this command in the R console (lower left) window. Let’s try this now.
- In the console type
4+9 - Then hit enter (or return)
- Is the result 13?
Success! Now let me show you another way that works well if you have multiple lines of code to evaluate or save. Working with a script (.R file) is better. This will utilize the upper left hand corner of your RStudio window. (You may not have anything there when you start working on a project, so let’s create one.)
- In
RStudioselect “File” then “New File” - Next select the first option “New Script”
- A new window called “UntitledX” should appear, where X is a number. You are set to go!
I like to use this window as a file to type stuff in and then evaluate it, which we will do next.
Pro tip: There are shortcuts to creating a new file: Ctrl+Shift+N (Windows and Linux) or Command+Shift+N (Mac)
2.2.2 Sending commands down to console.
Now we want to type and evaluate a command for R to do something. Click anywhere in the source file that you created and type the following:
4 + 9## [1] 13You have several options:
- Copying and pasting the command to the window. Shortcuts are Ctrl+C / Command+C for copying and Ctrl+V / Command+C for Windows / Mac.
- Run the line. This means that your cursor is at the line in your source file, then clicking the ‘Run’ button in the upper right hand side of the source window. Shortcuts are Ctrl+Enter / Command+Enter.
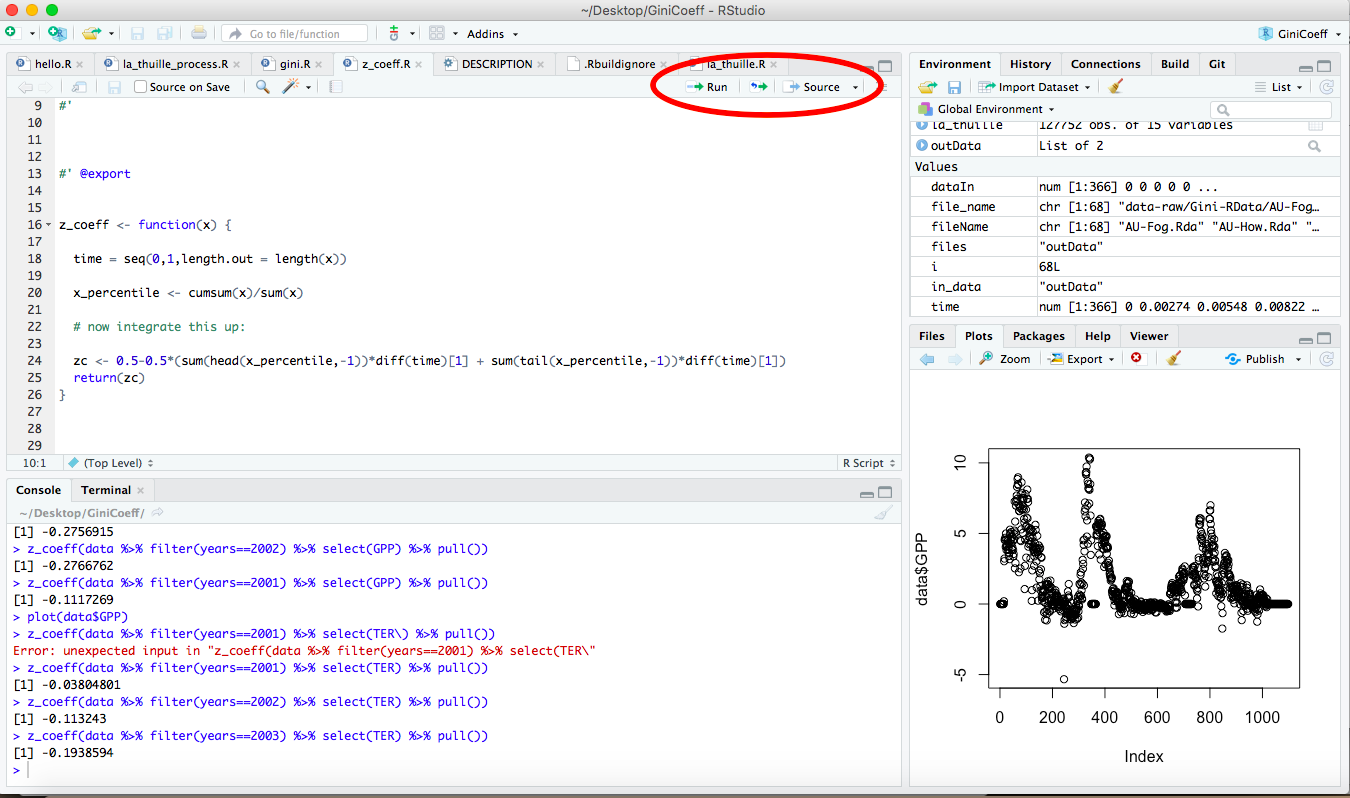
Figure 2.2: Sending a command to the console.
- You can also source the whole file, which means runs all the lines from top to bottom. You do this by clicking the source button, or with shortcuts Ctrl+Shift+Enter / Cmd+Shift+Enter (Windows / Mac). You can imagine this makes things easier when you have SEVERAL lines of commands to evaluate.
Why do I like working with a script file? Well if I run some commands that have an error then it is much easier to just fix a quick mistake and then re-run the code.
It is also helpful to annotate your code with comments (#), which appear as green text in RStudio.
2.2.3 Saving your work
The neat part about a source file is that it allows you to save the file (Ctrl+S / Cmd+S). The first time you do this you may need to give this a name. The location where this file will be saved is in the same directory as your .Rproj project file. Now you have a file that you can come back to! In general I try to use descriptive names of files to I can refer back to them later.